Semiautos? Sure, but which one?
Where a break-action gun always has just 3 main parts that can be disassembled manually (Holland & Holland-type locks aside), semiauto shotguns have several more moving parts that can be disassembled and inspected, which requires first of all an accurate knowledge of what we have in our hands, a suitable minimal equipment, and basic manual skills that must be considered essential for any serious hunter.
Since there are inertia-driven, gas-operated or long-recoil shotguns (the three main types of actions), we have to deal with different operating systems and related mechanics that require different approaches also with regard to maintenance and cleaning.
Inertia-driven
It's the system made famous by Benelli and today, after the patent expired, used by almost all manufacturers. The heart of the whole system is in the bolt assembly, where a powerful spring makes the entire mechanism work without any other moving parts.
Gas-operated
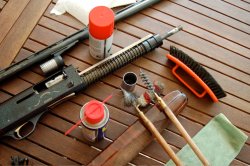
Beretta achieved excellence with the awesome A 300 series adopting this system. Unlike inertia-driven guns, it does not use recoil kinetic energy to work, but a part of the gas produced by powder combustion. Gas bleeds through some holes in a specific point of the barrel and is conveyed to a piston, forcing it into a backward motion controlled by springs and cams that enable the unlocking of the bolt and relative ejection of the spent case. The recoil spring then pushes the bolt forward, a fresh cartridge is chambered and the action is locked again.
Long-recoil operated
It's the oldest system, the legendary Browning Auto 5 being released on the market in 1905. Here the piston rod is fixed to the bolt assembly and the recoil spring is wrapped around the the magazine tube. When firing, barrel and bolt recoil together inside the receiver. Few are still around, but they are. Not to mention that Cosmi shotguns, the Ferraris of semiautos, use this same system.
The parts
A disassembled semiautomatic shotgun will have, 1) a magazine cap; 2) forend; 3) barrel (and chokes); 4) receiver and stock; 5) bolt. And if it's a gas-operated gun, also a gas valve/piston.
Materials and equipment
First of all, set up the workbench outdoors, or in a place where more than likely drops of oil and sludge will not make a mess (you should discard the kitchen or living room, especially if you are living together or married! Listen to me. I know what I'm talking about...). For those who have a dedicated workshop, the problem doesn't arise

- A workbench made of plastic or a material that will not damage the gun's parts in the event of a hard contact.
- An old towel to be laid on the workbench.
- A good shoe brush.
- An old, clean and dry toothbrush.
- A good quality paintbrush, new or clean.
- Kitchen paper in rolls.
- A microfiber cloth like those used for cleaning glass. Better if new, but a used one is fine too, as long as it's clean and dry.
- Brushes of the appropriate gauge.
- Gun lubricant or multi-purpose lubricant (Svitol or similar products – or sewing machine oils, if you can still find them), available in any hardware store. In case, diesel is a good substitute.
- Gun cleaner (this can be ordered online without any problem, and even in lockdown times you can find it).
- A pin punch and a hammer.
Of course, a thorough cleaning would also involve an air blow gun and the disassembly of some parts, but for this you'd better go to the gunsmith's.
Gun disassembly
After checking 2,200 times that the rifle is unloaded before handling it (done it? Do it again!), remove all carrying slings if you haven't already removed them previously.
First of all, with the gun still assembled and the bolt strictly open (for the reasons mentioned above), remove the choke you're using (in today's semiautos fixed-choke barrels are rarer than hen's teeth), holding the gun between your feet and using the choke key – that should be in the last place you left it (if you haven't lost it, which happens!).
After setting aside the choke (you should still have the appropriate storage box), unscrew the magazine cap, carefully take the forend off, and then – once removed the barrel – also remove the piston in gas-operated guns. Here begins the phase of careful cleaning.
Piece by piece
Cap: It looks like the least important piece, but it's not! It not only serves to hold the forend around the magazine tube, but it has a role of primary importance for the operation of the whole gun. More than that – in a now "old" Fabarm project (Euro 3) at least – it also works as an auxiliary gas relief valve to bleed off extra gas pressure. I would also add that it's the part that tends to develop more rust on its thread, so it must be cleaned and oiled well.
Remove dirt first mechanically using a brush or dry paintbrush, then with diesel or cleaner. Lubricate well, wipe excess oil, and put the gun away, before re-lubricating it.
Forend: in semiautos it never has an important mechanical role, it tends to collect dirt, and it's always better to give it a good brushing. A veil of oil on the inner face that is in contact with the magazine never hurts, either.
Receiver and stock: the less experienced can limit themselves to a strong brush to the whole bolt assembly and rails with abundant cleaner or diesel and then lubricate everything well. In short, they must clean all the parts, let's say so, that can be seen. Not forgetting the elevator and everything that can be reached. First, checking that no little seeds, leaf parts or pine needles remain. Then, moving on to chemicals. Also using paper to remove any dirty residues.
It's important to clean the trigger assembly well, too. This is done by first removing the pin (in some brands there are two) with which it's secured to the receiver, and then proceeding as usual for a thorough cleaning.
Those who have a little more dexterity, especially after a busy season can easily disassemble the stock, clean everything, and then move on to disassemble the bolt, taking care to start from the charging handle.
Be sure to always lubricate everything well before reassembling.
Barrel (and if present, gas valve assembly): for the barrel, proceed as usual, but – be careful – before vigorously brushing, reassemble the choke (that you will take care to have already cleaned and lubricated), also cleaning the thread where it will be screwed into! It's important to avoid ruining the thread in any way.
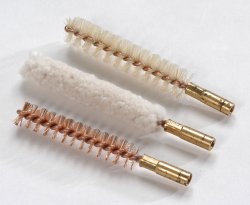
Once done, proceed as usual, using a bore brush in the correct gauge, then passing some paper soaked in a specific cleaner or diesel, then dry everything and lubricate. Lastly, wipe the excess with paper towel.
We are ready for the outside surfaces, if it's not a gas-operated gun.
Otherwise, we should still pay a lot of attention with the products and tools mentioned above to clean also and above all the gas bleed ports and all the moving parts of the system, from the piston to the gas cylinder.
For those who use long-recoil operated shotguns: never, ever lubricate the friction brake ring of the recoil spring assembly!!!
Reassembly and storage: before proceeding, put a little oil on all moving parts. Reassembly is accomplished in the reverse order to that described for disassembly. Once the job has been completed, remember to insert a snap cap and then pull trigger to decock the gun before storing it.
Obviously, after wiping with a lubricated cloth, the shotgun must be handled with it even when it's placed into a dedicated cabinet, to avoid leaving fingerprints on the most sensitive metal parts.


